





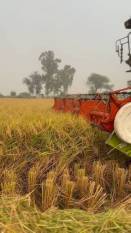


MUMBAI, 26 October 2026: Transitioning a farm field from a mature paddy crop to the next crop cycle—such as wheat, mustard, or pulses—is one of the most critical windows in agricultural management. Executing timely harvesting techniques and implementing sustainable soil preparation practices preserves essential soil nutrients, conserves residual moisture, and prevents field delays.
Phase 1: Determining the Optimal Harvest Time
Before cutting paddy stalks, timing must be calculated accurately. Harvesting too early leads to high moisture content, unfilled grains, and milling breakage. Harvesting too late causes heavy grain shattering and bird damage.
Key Maturity Indicators
-
Grain Color: Approximately 80% to 85% of the panicles in the field should display a clear straw-yellow or golden hue, while the lower stems retain minor greenish tint.
-
Moisture Content: Ideal grain moisture at harvest falls between 20% and 25%. Grains squeezed between teeth should feel firm and yield a solid snap without crumbling.
-
Timeline: Harvest typically falls between 28 and 35 days after heading (panicle emergence) during dry seasons, or 110 to 120 days post-sowing depending on variety duration.
Phase 2: Cutting and Harvesting Paddy Crops
Harvesting includes reaping, threshing, cleaning, and hauling. Farmers generally employ one of two primary execution methods based on labor availability, field scale, and budget.
Method A: Manual Reaping and Threshing
Manual harvesting remains ideal for small-scale farms, steep terraced plots, or seed-production crops where gentle handling is required.
-
Reaping: Using sharp serrated sickles, cut standing stalks 5 to 10 centimeters above ground level. Low cutting maximizes straw yield for livestock fodder and leaves less stubble to clear.
-
Field Drying: Lay cut stalks in uniform windrows across the field for 1 to 2 days to drop moisture to approximately 18% if threshing is delayed.
-
Threshing & Cleaning: Separate grains using stationary drum threshers or manual beating racks. Pass threshed grain through winnowers to separate chaff, empty hulls, and dust before bagging.
Method B: Mechanized Combine Harvesting
For medium-to-large landholdings, self-propelled combine harvesters complete cutting, threshing, and seed winnowing in a single pass.
-
Machine Setup: Calibrate reel speed 25?ster than ground travel speed and set cylinder clearance to prevent kernel fracturing.
-
Field Drainage: Drain field water 7 to 10 days prior to machine entry so soil achieves adequate bearing capacity for heavy crawlers or tires.
Phase 3: Post-Harvest Stubble and Residue Management
Managing leftover paddy straw is the most critical step before planting winter or secondary crops. Burning stubble severely degrades soil microflora and strips organic carbon; modern eco-friendly techniques yield far better long-term soil productivity.
In-Situ Management (Field Retention)
-
Direct Mulch Sowing (Super Seeder / Happy Seeders): Tractor-mounted Super Seeders cut, shred, and mix standing paddy stubble into the topsoil while simultaneously sowing the next crop (e.g., wheat) in a single operation.
-
Microbial Bio-Decomposers: Spray fungal/bacterial bio-decomposer solutions over chopped residue. These microbial sprays accelerate straw decomposition within 20 to 25 days, turning waste into humus.
Ex-Situ Management (Field Removal)
-
Raking and Baling: Run a rotary cutter/slasher followed by a field rake and agricultural baler. Compacted straw bales can be sold to biomass power plants, paper manufacturers, or livestock farms.
Phase 4: Preparing the Field Soil for the Next Crop
Once straw management is complete, soil preparation determines seed germination rate and root penetration for the upcoming season.
1.Primary Tillage & Aeration:Do not till if using direct-seeding Super Seeders.
Use a mouldboard or disc plough to break soil compaction down to a depth of 15–20 cm. This exposes soil-borne pests and weed seeds to solarization.
2.Nutrient & Soil Amendment Application:
Incorporate well-decomposed Farmyard Manure (FYM) or compost at 5 to 8 tons per hectare. Add targeted basal fertilizers (Phosphorus and Potassium) based on soil test recommendations.
3.Secondary Tillage & Secondary Pulverization:
Pass a rotavator or disc harrow twice across the field to break large clods into fine, crumbly soil tilth suitable for delicate secondary crop root structures.
4.Precision Land Leveling:
Deploy a laser land leveler to eliminate surface dips. Uniformly leveled fields optimize irrigation distribution efficiency by 20–30% and prevent waterlogging.
5.Pre-Sowing Irrigation (Palewa):
Apply a light pre-sowing irrigation 4 to 7 days before planting. Once the soil reaches workable field capacity (vattar condition), sow the seeds for uniform germination.
Summary Checklist for Crop Transition
| Phase | Core Objective | Primary Tools / Inputs |
| 1. Timing | Test grain moisture (20-25%) | Moisture meter, visual checks |
| 2. Harvesting | Reaping and threshing | Sickles, stationary thresher, or Combine Harvester |
| 3. Residue | Shred, mulch, or bale straw | Super Seeder, Straw Chopper, Baler, Bio-decomposer |
| 4. Soil Prep | Aerate, level, and moisten soil | Disc Plough, Rotavator, Laser Leveler, Pre-irrigation |
Properly combining precise harvesting timelines with modern residue management protects valuable topsoil structure while shortening the field turnover window for a high-yielding next crop.